Google Search Console Can Increase Traffic to Your Site: Here’s How

Google ranks your most popular pages for dozens, if not hundreds, of search terms. Even if you target some of those keywords, you probably don’t know all the terms attracting attention from search engines.

But there’s a free tool that can help you identify these “hidden” keywords and further optimize your content for them. This easy-to-implement, seven-step process can help you develop a strategy that could bring in thousands more visitors every month.

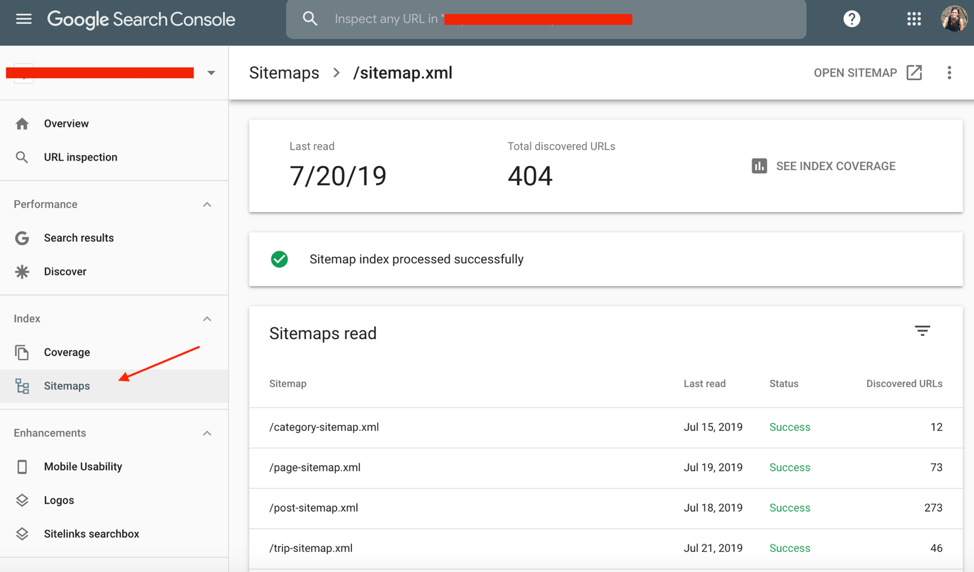
Let’s start with the basics. Over time, Google’s algorithm will rank each page for terms it thinks are relevant to the content. You can access those conclusions through the free Google Search Console. (If you haven’t already connected your site to your account, begin that process here.)

1. Get the big and little picture

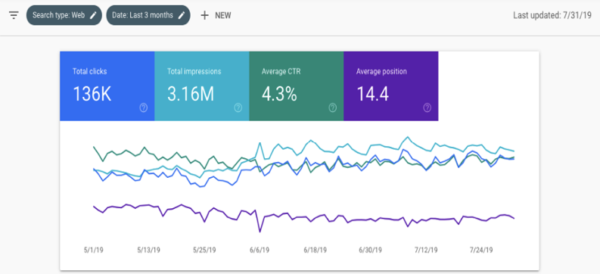
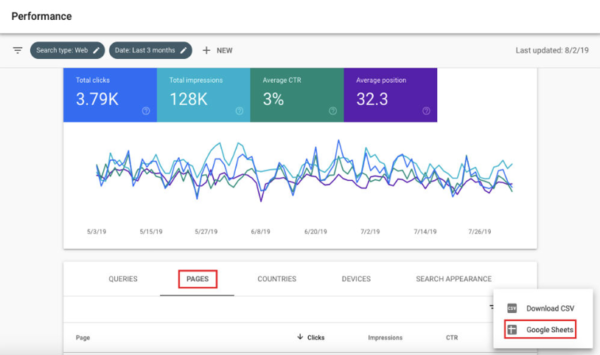
You arrive at the overview screen. Click on the performance tab in the left column to see an overview of your site’s performance, including:

  • Total clicks
  • Total impressions
  • Average click-through rate
  • Average position of your site (based on its highest position whenever it appeared in search)

TIP: The default view of the graphic (below) includes only total clicks and impressions. To see average CTR and average position in the graph, click on its corresponding box above.

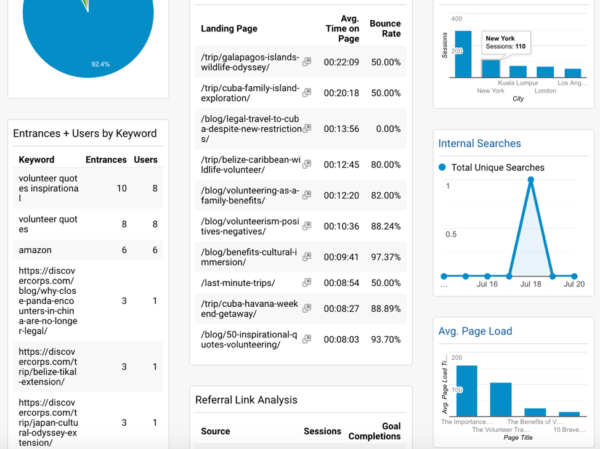
Below the overview graphic is a table with the individual pages on the site. Analyzing this information provides valuable insights about your content.

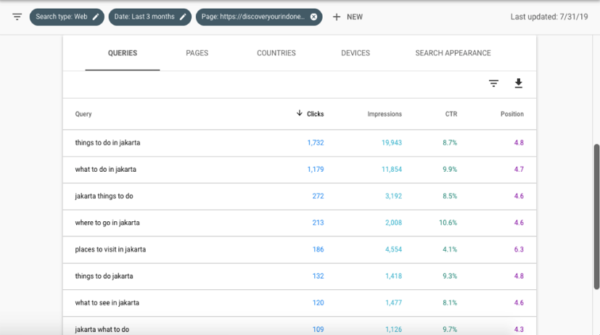
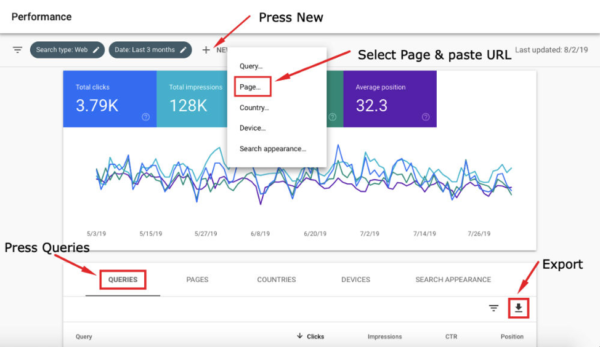
The tabs – queries, pages, countries, devices, and search appearance – allow you to analyze the data points (clicks, impressions, CTR, position) in different ways. Here’s a quick overview of the tabs:

  • Queries – all your ranking search terms
  • Pages – list of pages on your site
  • Countries – origin of visitors on your site
  • Device – how people interact with your site across mobile, desktop, tablet
  • Search appearance – inclusion in elements like rich snippets and accelerated mobile platforms (AMPs)

.@Google Search Console lets you see all your ranking search terms for free. @nhdprins #SEOCLICK TO TWEET

TIP: The default setting for sorting is bolded on the page. Click on a different header (i.e., impressions instead of clicks) to sort the pages by that measure.

Now let’s jump into how to evaluate this data. It involves spreadsheets, custom formatting, and a bit of color coding.

2. Export page keywords to Google Sheets

To understand which keywords your content is ranking for, review each page’s analytics individually.

Select the pages tab and export the data to Google Sheets. You now have the aggregate overview of each page’s appearance in search results.

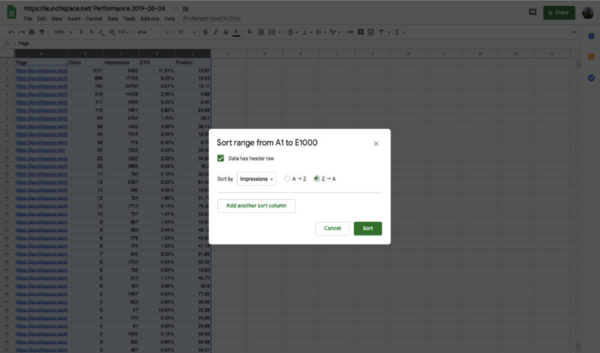
Now, identify which pages have the biggest impact on traffic by using the sort feature in Google Sheets:

  • Highlight columns A to E.
  • Click data in the menu.
  • Select sort the range.
  • Click data has header row.
  • Select impressions.
  • Choose Z to A.
  • Click sort.

Here’s a screenshot of what you should see when you have followed all these steps.

Now you can see your site’s individual URLs ranked by the number of impressions (high to low). The pages at the top are the ones with the most potential to bring more traffic with further optimization.

Select your top 20 pages by impressions.

TIP: Pick only content-focused URLs – most often these are articles from your blog. You can’t optimize your boilerplate pages such as the Contact Us page in this exercise.

3. Download the keywords

Now, let’s analyze the keywords for each of those 20 pages.

Go back to Google Search Console to collect this data:

  • Click the new button and select page.
  • Paste the first URL into the lightbox. Click apply.
  • Select queries from the table menu and click export to Google Sheets.

In your exported Google Sheet, sort the queries by impressions (see the sorting instructions in the previous step for a refresher on how to do this).

Repeat this step for each of the 20 URLs. Your master Google Sheet should now have 21 tabs.

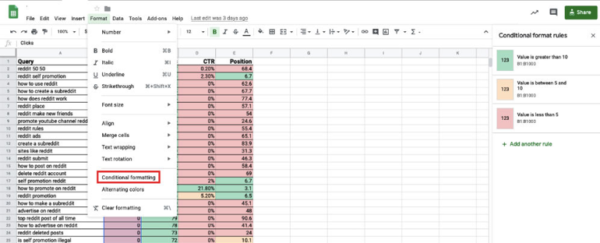
4. Apply conditional formatting

Conditional formatting is a set of rules you can use to analyze data on a spreadsheet. You can use it to identify keywords you want to focus on.

For example, I applied this formatting to the average position column with the following conditions:

  • Highlight rows with average position of 10 or lower in green
  • Highlight rows with average position between 11 and 20 in yellow
  • Highlight rows with average position 21 and higher in red

Use conditional formatting to easily show your keyword analysis in your spreadsheet, advises @nhdprins. #SEOCLICK TO TWEET

You can apply conditional formatting to a column or a single cell. Select format on the main menu and click on conditional formatting.

I applied a similar set of relevant rules for each of the four columns detailing the metrics. Access this template, which already includes these rules (i.e., conditional formatting) for your analysis.

5. Analyze the results

The spreadsheet now colorfully displays your keyword and content opportunities using a traffic-signal approach. Look at the green opportunities first, followed by yellow and finally red.

Take time to review the analysis to look for effectiveness of your targeted keywords, surprising keywords, patterns (e.g., high impressions but low CTR), etc.

Let me give you two examples of how you might use the information:

  • If a phrase is ranking on the first page and has a high number of impressions but a low CTR, optimize the page’s metadata to attract more clicks.
  • If a phrase in position 21 or higher has a high number of impressions but a low CTR, increase the keyword density in the existing content. (Don’t just stuff the keyword into your content as many times as possible. Look for opportunities to include it organically. For example, instead of using the pronoun “it,” use the keyword.)

6. Update your content and SEO plans

Now, it’s time to update your metadata and existing content to incorporate the high-ranking terms you have identified. Rather than rehashing how to do that here, I recommend you check out the following resources:

That brings us nicely onto the final phase of how to use Search Console for SEO.

7. Review the SEO impact of your updates

Updating old content and improving the metadata of your content is an ongoing process. Get into the habit of reviewing the impact of your post-analysis change. Ideally, do it two weeks after you update a metadata description and three months after you change the existing content.

Review 2 weeks after you update a metadata description & 3 months after changing existing #content. @nhdprins. #SEOCLICK TO TWEET

Go to Search Console and choose a page to review. Then select date range followed by compare.

You can analyze the data in Search Console or export it to a Google Sheet. If you see an increase in position, CTR, or number of impressions, your changes likely had a positive impact. If you see no change or a decrease in those metrics, you should tweak the metadata or make changes to your content.

Investigate and use the data

In this guide to using Google Search Console for SEO, I sought to provide a data-driven framework for reviewing and optimizing your existing content. It’s a system that covers how to find keywords that you probably weren’t even aware you were ranking for, how to identify the most relevant terms, and finally, how to review the results of your updates.

Let me know how your analysis and implementation goes. If you have any questions about anything covered in this post, let me know in the comments.

You Should Do This Helpful SEO Audit At Least Once a Year

Editor’s note: Given SEO’s role in content marketing and its rapid evolution, we updated this post on auditing your site.

Website content audits for SEO purposes have had a negative stigma associated with them for some time. They can be tedious, time consuming, and it can take time to see results, but they are necessary for driving website success.

Because of Google’s frequent algorithm updates and improvements, SEO rules and best practices are constantly changing. Reevaluating your SEO and your strategies is one of the only ways to stay on top of these changes and continue to move your website content forward.

An SEO website audit doesn’t have to be stressful or difficult, but it helps to have a plan before you and your team dive into this type of analysis. You need to know what you’re looking for, who is going to make what changes, and what tools are available to help you implement those changes.

An #SEO site audit doesn’t have to be stressful or difficult if you have a plan, says @ADiSilvestro.CLICK TO TWEET

Steps, tools, and what to look for in an SEO audit

Before diving into an audit, know what you’re looking to learn from the analysis of your SEO performance data and what website content goals this information will help you accomplish. Once you have a list of your goals, you can create a checklist of items to identify and evaluate.

Collect your website content analytics

Going through and gathering all the data and analytics for your website content (traffic, keywords, referral traffic for each landing page, etc.) is key. Given that this data changes frequently, set up dashboards that make it easier to track it accurately for every audit you perform.

Below is an example of a custom dashboard I built for my company Discover Corps (learn how here) and the kind of SEO information you should add:

Once you have this report, you can slice and dice the data to find trends and areas that need help (more on that later).

Analyze your targeted keywords

Review the keywords you’re targeting and using most frequently in your content to identify any changes in their performance. You also should analyze them for relative value to your business compared to your competition. Conduct research on overall keyword performance trends to stay on top of the terms worth pursuing in the immediate future.

I recommended using the Google Keyword Planner to make this happen. Below is a screenshot that shows the type of information you can get from a tool like this. Because this data comes from your competitors, the competition is particularly interesting:

Click to enlarge

Track potential sitemap concerns (and make sure they are set up correctly and completely).

Creating an XML sitemap can help you make sure search engine bots are seeing what they should be and indexing and caching your pages quickly. As you want to make sure users see the most updated version of your pages, check your sitemaps regularly.

Create an XML sitemap to make sure search engines are indexing & caching your pages quickly, says @ADiSilvestro.CLICK TO TWEET

Below is a screenshot of a Google Search Console. In this case, I set up different sitemaps based on the areas of my website (landing pages, product “trip” pages, pages on site, and blog categories):

Click to enlarge

Unsure how to check your sitemaps or set a sitemap up correctly? Visit this article. You typically handle this through your web hosting company, such as GoDaddy or WP Engine.

Use a web hosting company such as @godaddy or @wpengine to set up or check a sitemap, says @ADiSilvestro. #toolsCLICK TO TWEET

Look for your indexed pages

Make sure all the pages are being indexed correctly and your best content is making the cut. Check this by typing site:www.domain.com into the search engine. You can see what content appears in the list of indexed content. This can be harder on a large website, but it’s healthy to check once per week.

TIP: You also can see indexed pages in Google Search Console where your sitemaps are housed.

Check for linking concerns on site

Obviously, make sure you don’t have any broken links on your website. Routinely go through and spot check internal links to make sure everything still works, especially on pages where your older content resides. It’s also important to have at least one or two internal links within all your content. This is good practice for creating a quality user experience, as well as for SEO.

A lot of free tools check for broken links on your site. I use Broken Link Check each quarter. It’s an easy tool that spits out the broken link and the page where it appears. Then I manually fix the link.

Check for linking concerns off site

A great way forward with this step is to use an SEO tool to help identify links on other sites pointing to your site. External sites using poor or broken links to your site can significantly impact your SEO. If you find this problem, ask the sites to remove or update them by contacting the publisher or using the Google disavow tool.

External sites using poor or broken links to your site can significantly impact your #SEO, says @ADiSilvestro.CLICK TO TWEET

As far as tools go, I use Ahrefs and have used SEMRush. However, tons are on the market. I recommend signing up for a few free trials, locking your price point down, and going from there.

Keep an eye on page speed and load times

Make sure your pages load quickly and completely so visitors aren’t turned away. Significantly improving your load times can require the work of a skilled developer (I recommend checking out this article for a more detailed explanation of what’s involved). At the least you should address the most obvious causes of slow load times. For example, make sure your images are compressed and optimized appropriately, and make sure they are severed in “next gen” formats. Take the big images loading on your pages and convert them from .jpg, .png, or .webp (you can use a free online image converter such as this). It’s time consuming, but it’s one of the few things you can easily fix without the help of a developer – and we all need that every once in awhile.

Check your load times with the tool Google PageSpeed Insights. Below is an example of what you’ll see. Notice you can see a score with suggestions for both mobile and desktop. Once again, I recommend taking care of the images as best you can, and then simply passing this list of tasks to a developer (expect that it could be complicated and time consuming):


TIP: Always, always, always record everything you do. If you find an error on your website, always document it. You want to keep a record of things you changed and fixed so when you perform your next audit, you are reminded of what’s happened. Use a spreadsheet to note the dates, page URLs, the errors, the fixes, and party responsible for each change.

In between #SEO audits, record any changes and fixes you perform on the site, says @ADiSilvestro.CLICK TO TWEET

Why you need to perform regular SEO audits

I touched on it earlier, but it’s worth noting that an SEO website audit needs to be done regularly. A good rule of thumb is to perform an audit once per year, although I and others recommend at least two reviews per year. Among the reasons to commit to a regular audit:

  • Algorithm updates and webmaster guidelines change.
  • Content gets outdated quickly.
  • Website errors, including broken links, can lead to a drop in traffic.
  • Negative SEO and poor sites linking back to your site can be detrimental.
  • SEO audits serve as a marker to know when something went wrong and how long it’s been going wrong. This can help you determine the cause of the problem.

Keep records of everything you do and it should only get easier and easier. It can take a long time to see SEO results, so the faster you can get on top of anything slowing your site the better.

Whether it’s you and your team performing the audit or an SEO agency, keep up with the process. The first audit might seem daunting, but I promise it gets easier and easier each year.

Have you ever completed an SEO website audit? What tips do you have for webmasters just starting out? Let us know your story and your thoughts in the comments.